Thursday, December 22, 2011

Van Diemans Brewing - White Hills White Ale

This a bottle conditioned White Ale, produced by a Tasmanian brewery located in Evandale. Like all white ales, this is low-hopped and hazy, highlighting the flavours produced from the Belgian yeast and wheat malt. The bubbles are large and coarse which overpowers the subtle citrus flavours and I imagine it would benefit from a few months more in the bottle. Well balanced, there are no real stand-out flavours or aromas which makes this a nice, but nothing special beer. The coarse carbonation means I wouldn't choose this as a 'more than one' drinking beer.

3/5 Coasters

Saturday, December 10, 2011

Hobgoblin Extra Strong Ale

Hobgoblin and the other brews produced by Wychwood Brewery are among my favourite British beers, and so I was very excited to get my hands on a recipe for the beer characterised by the axe wielding goblin.

The Hobgoblin


This is my third all-grain brew and was a full day effort thanks to the many hiccups I had with my new three ring burner on the balcony (incorrectly sized connections). 


The guardian of the mash tun
The grain bed
My new burner
This beer takes a variety of specialty malts for the colour and Styrian Goldings for the flavour and aroma.
This batch uses reclaimed Irish ale yeast from my Amber Ale brew. I'm looking forward to tasting the result!

Gravity: 1.050 (Target 1.059). FG 1.010 (target 1.016) ABV 5.7% (target 5.5%)
Yield: 19 litres (target 18.9 litres)
Brew method: All-grain with US batch sparging.
Notes:My final gravity was off quite a bit, but I'm hoping that I can reclaim the ABV during fermentation (my last all-grain batch ended up .010 lower than the predicated gravity). I'm unsure as the cause to this. On the recommendation of a couple of fellow beer lovers, brewers and chemists, I compensated for liquid lost during the boil by adding water near the end. It could be either this or inefficiency in my sparging. 

McNeill's Firehouse Amber Ale


This is another beer that uses East Kent Goldings for it's bittering, flavouring and aroma hops. This simple Amber Ale, coloured with US Crystal Malt, gets dry-hopped with Cascade to give it a bit more character.


Gravity: 1.054 (Target 1.055 - 1.056). FG 1.017 (target 1.016-1.017)  ABV 5.3%
Yield: 19 litres (target 18.9 litres)
Brew method: Extract with US batch sparging for the specialty grains
Notes: Straight forward brew. I transferred it to the secondary fermenter for dry hopping after about 5 days to ensure there was still some yeast activity to ensure a layering of CO2 (which will prevent oxidisation). I also boiled up a small amount of DME and finings to kick start extra fermentation and to hopefully clear the beer a bit more before bottling. This was all added during the dry hopping phase.


I also reclaimed the Irish Ale yeast from the brew for my next three beers: HobGoblin Extra Strong Ale, Tom Mik's Imperial Stout and, Shipyard LongFellow Ale.

Sunday, December 4, 2011

Mountain Goat India Pale Ale review


Beautifully coloured and delightfully hopped, this IPA combines the pineapple and passion fruit flavours of galaxy hops with the bitter pine tones of cascade. A lovely aroma over a well balanced body makes this a very nice example of the style. Wheat and English Crystal malt provide the dark amber colour and the pleasant, full body. A short bitter finish rounds off this great beer. An excellent drink for enjoying with friends over a good lamb curry.

Thursday, December 1, 2011

Indian Summer Pale Ale - Tasting notes


Method: All-grain
Specialty grains: US crystal malt.
Hops: Northern Brewer (bittering), Cascade and Williamette (flavour and aroma).
Yeast: London Ale (liquid)

Comments: This beer fermented much further than the recipe suggested it would which is why I ended up with a much higher ABV. I have yet to work out why this happened.

ABV: 6.2% (the recipe suggests 5.0%).
Yield: 16.5 litres

Tasting notes: This was ready to drink after 4 weeks and is a very refreshing brew.
It pours with a white frothy head made from large bubbles over a cloudy pale amber beer. The hops are very noticeable in this brew with hints of stone fruit and a melon finish. Well carbonated after five weeks with a medium body.
This is a beer designed to be drunk in a pub accompanied with pub food - imagine a plate of thick cut chips with aoli and serving of lemon pepper calamari.

What I learnt: This was my first all-grain brew that was done properly. It makes a complex and satisfying beer. The only downside of all grain to extract brewing would be all the additional equipment required and additional hours you need for sparging and cooling. It really does make you feel a little wasteful using a wort chiller to get the temperature down however, I can see no other way, something that hasn't been an issue with my extract brews (where I use bricks of ice to bring down the temperature). 

Would I make this again? Maybe, but probably not. It's a complex beer and you could only manage one or two at a stretch before it began to labour on you. There are plenty of other Pale Ales out there to try before I come back to this recipe.

Friday, November 11, 2011

SW1 - English Bitter

The last English Bitter I made was from a can kit, and it tasted terrible. It is with this trepidation that I come to making my first extract bitter modeled on SW1.
SW1 is not a particularly complex beer - it has British Crystal malt as it's specialty grains and used East Kent Goldings as it's bittering, flavouring and aroma hops.

Gravity: 1.038 (Target 1.039 - 1.041). FG 1.012 (Target 1.009-1.010)
Yield: 19 litres (target 18.9 litres)
Brew method: Extract with US batch sparging for the specialty grains
Notes: Straight forward brew. I Might have put the aroma hops in for a minute longer than I should have but I'm hoping this won't affect the smell.

Sunday, November 6, 2011

Lucknow IPA - Brewing notes


For me, the word Lucknow evokes the drama and bloodshed of the Siege of Lucknow during the Indian Mutiny of 1857. The Occupy! movement around the world has nothing on the Indian Rebellion where the native population of a country took it upon themselves to try and shrug off what amounted to government sponsored corporate control of an entire country and it's occupants. Imagine having your entire country run by a company whose only purpose was tow ring as much wealth out of you and your natural resources to send overseas? To say things were in a bad way is an understatement. This was colonialism at its most unsavory, and it took the brilliance of Gandhi before independence was finally achieved, ninety years later.
Reading the histories of the many wars across Queen Victoria's empire, and the comical recounting by the fictional Harry Flashman, it was the battles of the Indian Rebellion that stood out the most to me, much as did this beer when I was flicking through my book of recipes.

It's an American Indian Pale Ale heavily hopped with Cascade, one of the most popular American varietals. One of the more important reasons for choosing this ale was it gave me an opportunity to use the London Ale yeast I had reclaimed from my Indian Summer Pale Ale (is there a theme here?).


Chinook and Cascade bittering hops

After the sparge (using my homemade mini-mash tun)

The boil

Gravity: 1.062 (Target 1.059)
Yield: 20 litres (target 18.9 litres)
Brew method: Extract with US batch sparging for the specialty grains
Notes: This went surprisingly smoothly and my method of using large ice blocks when topping up the water in the fermenter means I can get down to temperature in about 30 minutes. The yeast starter (using the reclaimed London Ale yeast) hadn't really kicked off when I pitched it so I'm just going to hope that it was reactivated and all will be well. 


*Edit* Twelve hours later and I have a very healthy krausen forming on top of my wort. Looks like the yeast survived!

My only frustrations today was finding out that the Brew shop had left off 3 kg of light malt extract from my order so I was unable to put the Ginger ale on as planned.


*Edit* 6 Days later, fermenting activity has subsided so I'm now moving onto the dry hopping stage. This will add extra hop flavour and whole lot of hop aroma. 
To dry hop, you add the hop pellets to a secondary fermenter and then drain the primary fermenter right into the second. There is no need to worry about contamination at this stage as most of the fermentables (read "food for infections to grow on") have already been converted to alcohol, and the hops have antibacterial properties (hops were originally used in beers as a preservative which is why IPAs are heavily hopped - they required a highly level of hop oil to preserve the liquid for the long voyage on ships from England to the Indian subcontinent where they served to slake the thirst of the colonials).


The beer will stay in the secondary fermenter for 2-3 weeks till it clears further (meaning the sediment will settle out of suspension) and it will then be bottled in the regular way.


transferring the beer to the secondary fermenter

Saturday, November 5, 2011

Wicked Elf Pale Ale

Wicked Elf Pale Ale is made in the American Style whose main point of distinction is the use of American hops for bittering and flavouring.


This is a nice ale, but nothing really stands out as remarkable. There is a subtle hint of caramel from the malt covered by the bitter pine flavours of the Cascade hops that lingers in the mouth. It pours with a lovely amber colour and a clear bright head.

It's nice, but not something I'll be revisiting anytime soon. For a better example of an American Pale Ale try the Matilda Bay Alpha Pale Ale.

Mountain Goat Organic Steam Ale

This is an organic Steam Ale - beers characterised by high effervescence and fermenting lager yeasts at higher temperatures than normal (lagers are usually fermented between 5 - 11 degrees).


My opinion is that it's a well made beer - but not one that I can really get into.

It pours with a bright yellow body and a thin head that quickly dissipates. The first smells are of the malt typical of commercial lagers however this is soon replaced by the instantly recognisable Galaxy hop aromas.

The flavour is dominated by the pineapple and passion fruit flavours of Galaxy followed by the malt that rides the high carbonation. I have to say, this is not a beer I'll likely buy again but it is a good example of a Steam ale. The Galaxy hops always make a beer that you feel should be drunk by the sea during a hot Australian Summer however, in my opinion, the Pacific Ale by Stone & Wood is a better example of Galaxy flavoured beer.


Tuesday, November 1, 2011

Reclaim the yeasts!


When you get down to it, home brewing is not just about making beer in your bathtub or garden shed. It’s about joining a clan of individuals, united by their desire to maintain the thousands year old art of turning water with a bit of grain slush into a potable (and potent) drink. Whether you join the ranks from a desire to save money on commercial beers or with a craftsman push for perfection, it doesn’t matter. You have joined a group who are bonded by the brewers craft and, as it turns out, a common language that appears to have been dreamt up after about 6 too many Scottish Heavy Ales.

What on earth do I mean and what does this have to do with yeast?

The other day was bottling day for my Indian Summer Pale Ale. As many brewers know, much of the quality in flavour comes from the yeast. The higher quality of yeast, the better it ferments out the sugars and the better it tastes. Unfortunately, this comes at a price. My local brews shop sells liquid yeasts at $15 a pop. This can be as much as a third of the cost towards making a beer. To make it a little more profitable, you can actually reclaim the yeast from your last beer to use again.

Now here is where the language of brewing starts to come into its own.

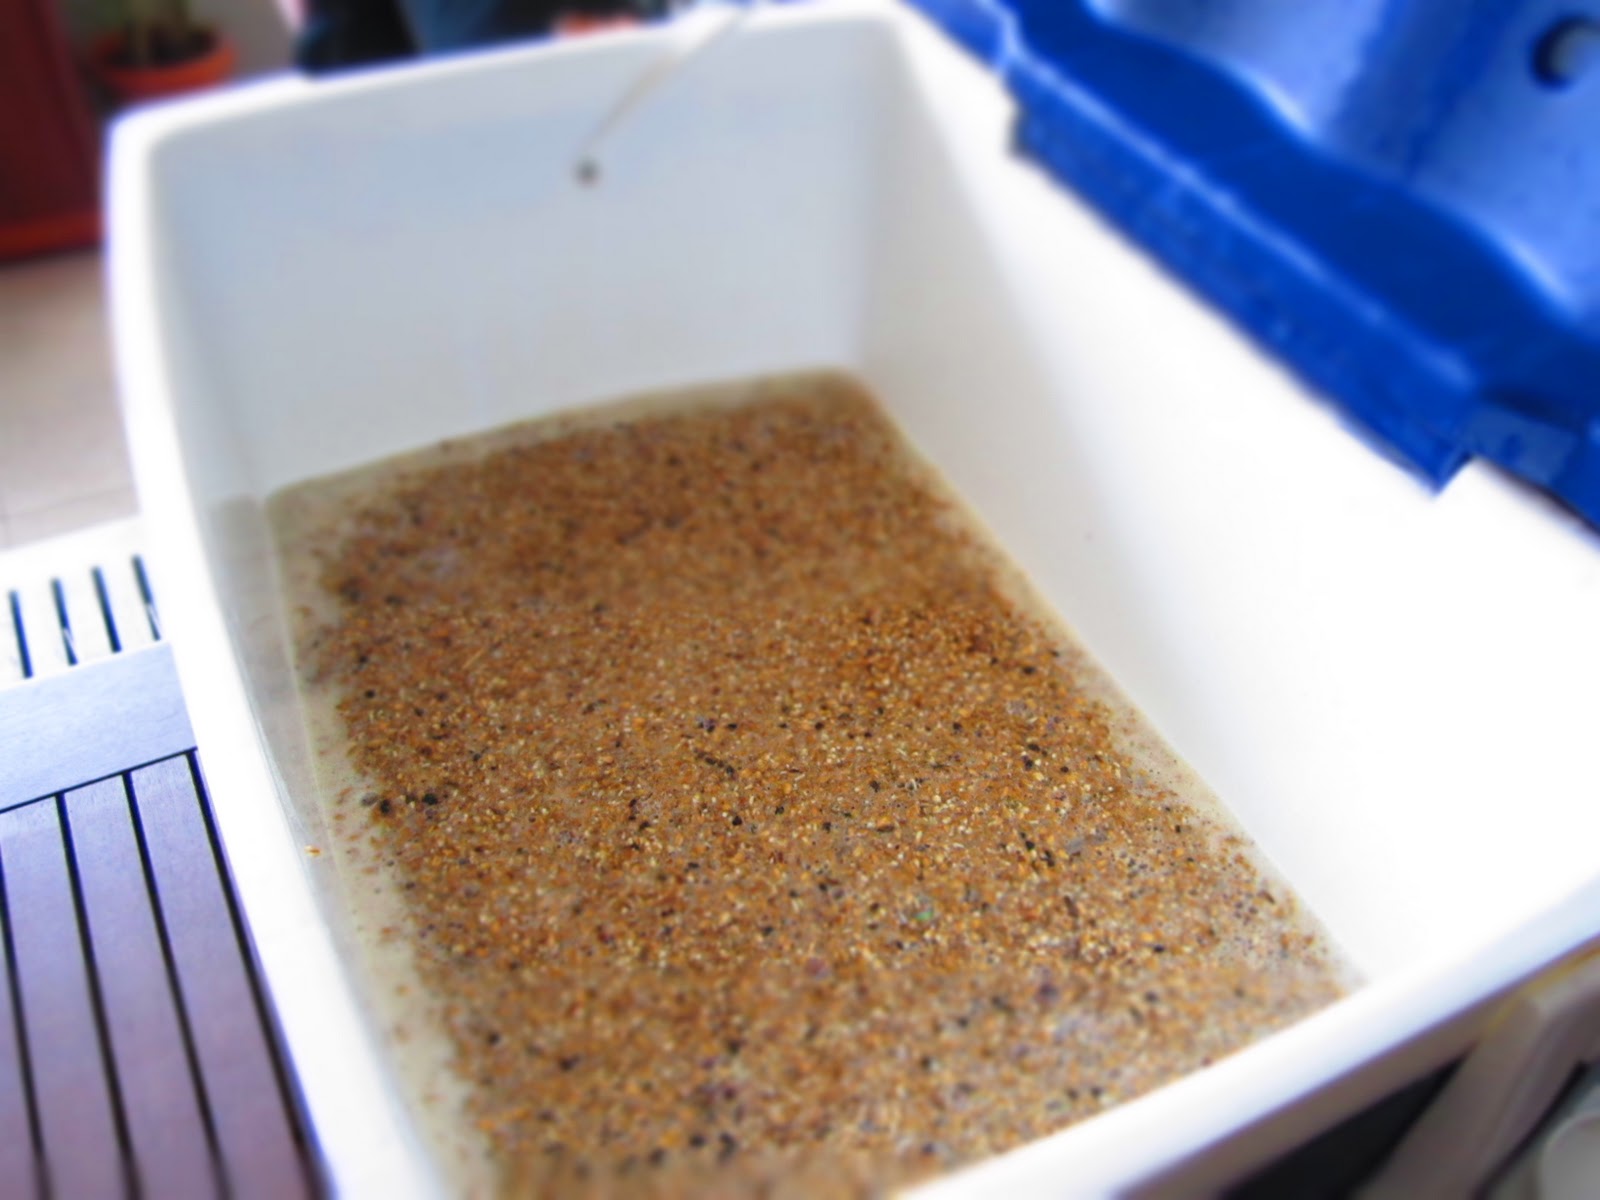
As your brew ferments out, you develop a layer of sludgy material in the bottom of your fermenter called the ‘trub’(see image). This is made up of expired yeast (yeast that has done all of its fermenting work and now has nothing to do), as well as fats and proteins that have settled out of the liquid. It is also referred to as a ‘yeast cake’ (possibly when it is no longer in liquid). No, it’s not like any cake you want to eat, it’s more like the stuff you find in that jar at the back of the fridge that might have had tuna mornay in it about 4 months ago.
My trub (or possibly yeast cake)

At this point, there are a couple of options for reusing the yeast. You can leave it there and pour the next batch of beer straight on top (the act of adding the yeast to beer is called ‘pitching’) or, ‘wash’ your yeast and store it in the fridge to be used again.

Washing yeast sounds about as productive as trying to clean dirt, but this is the terminology brewers use. It basically consists of taking sterilised water and adding it to the yeast cake to get the thick sludge into suspension. Transferring this suspended sludge to a large jar you let the sludge settle a little bit, at which point most of the heavier material will settle to the bottom (this is all the stuff you don’t want in your reclaimed yeast. You can then collect the ‘cleaner’ yeast of the top into sterilised jars and store them in the fridge.
Washed yeast

What do you do with it now? Well, I’ve read a number of different views. Some say you should only keep it for 5 days, others say you can keep it for up to 3 months. I’m going to attempt the later because frankly, I’m not brewing a new batch every few days. When it finally comes time to use it, you create a starter. This is where you add the yeast to warm sterilised water mixed with some sugar that the yeast will use to start multiplying with. If the yeast takes off, you’ve got a usable product for your home brew. If it fails to thrive – bin it.
One day later, I now have trub (that I created from my trub)

So what of rest of the brewing lexicon? We have worts, hops and grist. One indulges in a bit of mashing, sparging and racking. There is the krausen and the trub. We have to pay attention to the gravity, attenuation and our lag phase. Considering the science of brewing is called zymurgy, it’s not surprising that talking to home brewers is like a conversation with a drunk.

Friday, October 21, 2011

Paulaner Heffe-Weissbier

This was a commissioned beer, and my first all-grain brewing attempt. I did many things wrong; I went for cheaper ingredients, forgot to sparge (the horror), diluted the wort afterwards as if it was an extract brew, and finally I am tasting it very early (barely 3 weeks in the bottle). The surprising thing is that I still have an enjoyable thirst-quenching drink, which to me is vindication of all-grain homebrewing; as long as you adhere to good sanitation practices, it's very hard to make an undrinkable beer.


Of course when it comes to homebrew can kits, it's a whole other story (that stuff is just nasty).


This is a classic wheat beer (as the name suggests) modeled after the Paulaner recipe. The total cost for ingredients came out at about 40 AUD, largely as there is only one hop variety used and I chose to go for a dried wheat beer yeast rather than a liquid one.


Method: All-grain
Specialty grains: German dark Munich malt.
Hops: German Hallertau Hersbrucker.
Additional: None.
Yeast: Wheat beer (dried)

Comments: I added finings to clear the beer in the primary fermenter and bottled with carbonation drops after a week and a half.

ABV: 4% (the recipe suggests 5.4%).
Yield: 19 litres

Tasting notes: I'm drinking this early so the flavours will mature in the next two to three weeks when it is primed for tasting. There is no hop aroma as the Hallertau is only used for bittering so what you get is the lovely wheat malt smell right out of the bottle. It pours with a lovely light straw colour and a white head made of large bubbles that quickly dissipates (they will refine a little more as it ages and as the carbonation improves in the bottle, so will head retention). The flavour is of a wheat beer that has decided it wants to see what life is like as a lager. You expect a little bit more body but it isn't there, which isn't necessarily a bad thing. My home brewing error has created a beer that will be perfect for the event it has been brewed for (an all day poker tournament with a German food theme). I like this beer. It's a hot day and this had turned out to be a very refreshing drop. Definitely a beer I will brew again, if only to see what it tastes like when you make it properly.

What I learnt: 
1. Sparging is an important step that should not be left out of all-grain brewing.
2. Read the bloody instructions you fool!

Sunday, October 16, 2011

Indian Summer Pale Ale - Brewing notes

Today I started an all-grain brew with an Indian Pale Ale. One thing I hadn't realised when I bought my slightly bigger brew pot (24 litres) is how much liquid one loses when boiling for an hour. In hindsight I could have done with a 30 litre pot in order to get the 18.9 litres recommended by the recipe by the end of the boil. We live and learn I guess. One day I'll cave and buy a 30 litre but until then I'll resign myself to the fact I'll be making smaller brews (or adding some DME to increase the gravity and topping up with water once it's in the fermenter). I have yet to work out if this changes any of the characteristics of the beer but I'll be sure to let you know if it does.


Pale Malt is the grain of choice to add body, and Crystal malt for flavour. This IPA uses a number of hops to give it a long finish and citrusy body. On show are Williamette, Cascade and Northern Brewer (instead of Chinook).

Unlike my first attempt at all grain - I calculated the mash and sparge water correctly and collected about 22-23 litres for the brewpot. I lost almost 7 litres over the hour of boil.

Flavouring hops and Irish Moss
waiting to go in during the last 15 minutes


The boil

Cooling the wort with my home made
chiller

London Ale Yeast
Gravity: 1.048 (Target 1.052-1.054). Final gravity 1.004 (doesn't seem right! target is 1.014)
Yield: 16.5 litres (target 18.9 litres)
Sparge method: US batch sparging
Notes: The lower gravity may be due to inefficiency in my mash and sparge. The recipe assumes 70% efficiency however, I do not have the patience for continuous sparging so I will stick with batch sparging. By my incredibly dodgy calculations, I estimate that I am at 65% efficiency.

Japanese Lager - Ashahi Dry clone

I'm very fond of Japanese beers (at least the ones they export. The Japanese do some strange things with beer on occasion, such as All Clear - a zero alcohol beer made by Suntory. It may be zero alcohol, but it is also zero taste.) and so when I found this recipe in Clone Brews I jumped at the chance to make it. Whilst the end result does not really match the commercially made Asahi, I am very happy with the results.


Method: Extract 
Specialty grains: German light crystal malt.
Hops: Czech Saaz.
Additional: Rice Syrup extract.
Yeast: Pilsen lager (liquid)

Comments: I added finings to clear the beer in the primary fermenter and bottled with carbonation drops after a week and a half.

ABV: Not recorded (the recipe suggests 4.1%).
Yield: 19 litres

Tasting notes: This was ready to drink after 4 weeks and is a very refreshing brew. It has a bit more body than the commercial version and the flavouring hops are more present on the tongue. The dryness from the Rice syrup is there and it finishes clean so it tastes similar and feels like an Asahi however, when drinking you can't help but feel there is more beer there; fruitier and more complex. I am very happy with this one. The only problem will be keeping it all for myself. In fact, scratch that. It's a terrible beer - worst I have ever made. It made me violently ill. Twice.

What I learnt: I managed to get the wort down to temperature quite quickly by adding ice instead of water when making up the wort to 18.9 litres in the primary fermenter. One thing I didn't manage which may have changed the flavour was to keep the fermenter under 15 degrees during fermentation (it was just too warm. I even tried leaving it out on the balcony overnight in the chill air but could not get the temp down - and I have no space for a second fridge in our one bedroom apartment) so the yeast had done it's work in under a week. I'll probably think twice before brewing another lager (which require brewing temperatures between 6-11 degrees), particularly now as Summer has finally arrived.

Belgian Ale - Duvel clone

The first recipe I tried from Clone Brews was an ambitious Belgian Ale. I managed to knock up a mini mash tun from a 10 litre esky and some steel braid and then set off to buy the specialty grains. For a first attempt I think it went smashingly well.
As with all recipes that I take from this book. I shall only be listing what ingredients I used. It is up to you to hunt down the original recipe (let no one accuse me of not respecting another man's copyright!)


Method: Extract 
Specialty grains: Belgian aromatic malt, German light crystal malt.
Hops: Styrian Goldings (bittering), Czech Saaz.
Additional: Belgian clear candi sugar.
Yeast: Belgian Ale yeast (liquid)

Comments: I added finings to clear the beer in the primary fermenter and bottled with carbonation drops after a week and a half.

ABV: 7.8% (compared to 8.5% from the recipe).
Yield: 19 litres

Tasting notes: This hits you like a velvet glove filled with a brick. Strong and fruity. The alcohol sits there behind the flavours ready to give you a black eye as soon as you drop your guard (which is after 2 pints). As you can see from the picture, it developed a great white frothy head made up of fine bubbles and the beer was clear with an excellent colour and has a short finish (which I learnt  is a characteristic of malty or sweeter beers (low hops) ). Compared to a commercial bottle of Duvel, this recipe is very close. 

What I learnt:
I ended up putting a little to much liquid into the wort when trying to cool the liquid enough to pitch my yeast. and I think this affected the final ABV however; I'm not too fussed as this tastes fantastic.


Literature

Like any good Librarian, I've started to build up a collection of homebrew titles. There is always something one can learn of this ancient art, and not having the best recall in the world, it helps me greatly if it is written down.

If your looking for recommendations; here is what can now be found crammed into my bookshelf between Bruce Campbell's autobiography 'If chins could kill' and Umberto Eco's 'Foucault's pendulum':


  • The Complete Guide to Beer & Brewing by Laurie Strachan 
This is a good introduction to beers and brewing with some recipes for the novice homebrewer (adding additional hops to can kits) and a few for the more adventurous (extract and all grain). He tends to have a harsh word in regards to Australian beers and some of his advice is a little lacking in detail and occasional at complete odds with what I have discovered to be conventional wisdom. My general impression is that that it is well written however, I am not convinced that following his directions will really set the novice brewer onto the right path.


  • Radical Brewing by Randy Mosher

With a name like 'Randy Mosher', you would imagine he has a lot to live up to and in this book he succeeds. It is an excellent all round read; full of interesting and essential facts and useful recommendations. The style is light-hearted and this makes it an enjoyable read. There are plenty of recipes, ranging from novice to advanced to get you started, including a number of interesting brews that have already been requested by my wife (the Juniper Rye Bock for starters). If there was ever anything you needed to know about beer or brewing, you'll find it in this book.


  • Clone Brews 2nd edition by Tess and Mark Szamatulski


As the subtitle suggest; there are over 200 recipes for commercial beers in extract brewing format. All of these recipes are supplemented with additional instructions for mini-mash and all-grain brewing methods. This is an invaluable resource, and although a  large majority of the beers are a bit too commercial (do I really want to brew a Foster's Lager?), there is plenty here to keep you occupied.


  • Beer Captured by Tess and Mark Szamatulski

Another great title by Tess and Mark. 150 excellent beer recipes. There tends to be a bit of an American focus however, the beers that appear in this collection are the higher end range of brews set out in the same format as Clone Brews. This is another must for anyone wishing to go further than can kit brewing.

A new direction

It would appear that I have let this blog lapse. It cannot be helped; my life is clearly not interesting enough to recount every detail. An unused blog however, is such an eyesore, and to this end I am resurrecting it to a new glory. It shall be a diary of my home brewing endeavors (and potential home cooking tragedies) so that I may catalogue and monitor my efforts - what works, and what doesn't. Read it, or don't. It shall be here nonetheless.

Bibo Ergo Sum - I drink therefore I am.